What this guide will help you do
A bicycle helmet needs to sit level, stay securely in place and feel comfortable. This guide explains how to choose a starting size, position the helmet, adjust its rear fitting system and arrange the straps. It then helps you identify common fit problems and understand when a helmet needs replacing.
You need the helmet’s instructions, a flexible tape measure and a mirror or helper. Start at step one if choosing a size; if you already have a suitable helmet, move to positioning. The pictures illustrate the actions; follow the instructions for your particular helmet.
Step 1: Measure your head and choose a starting size
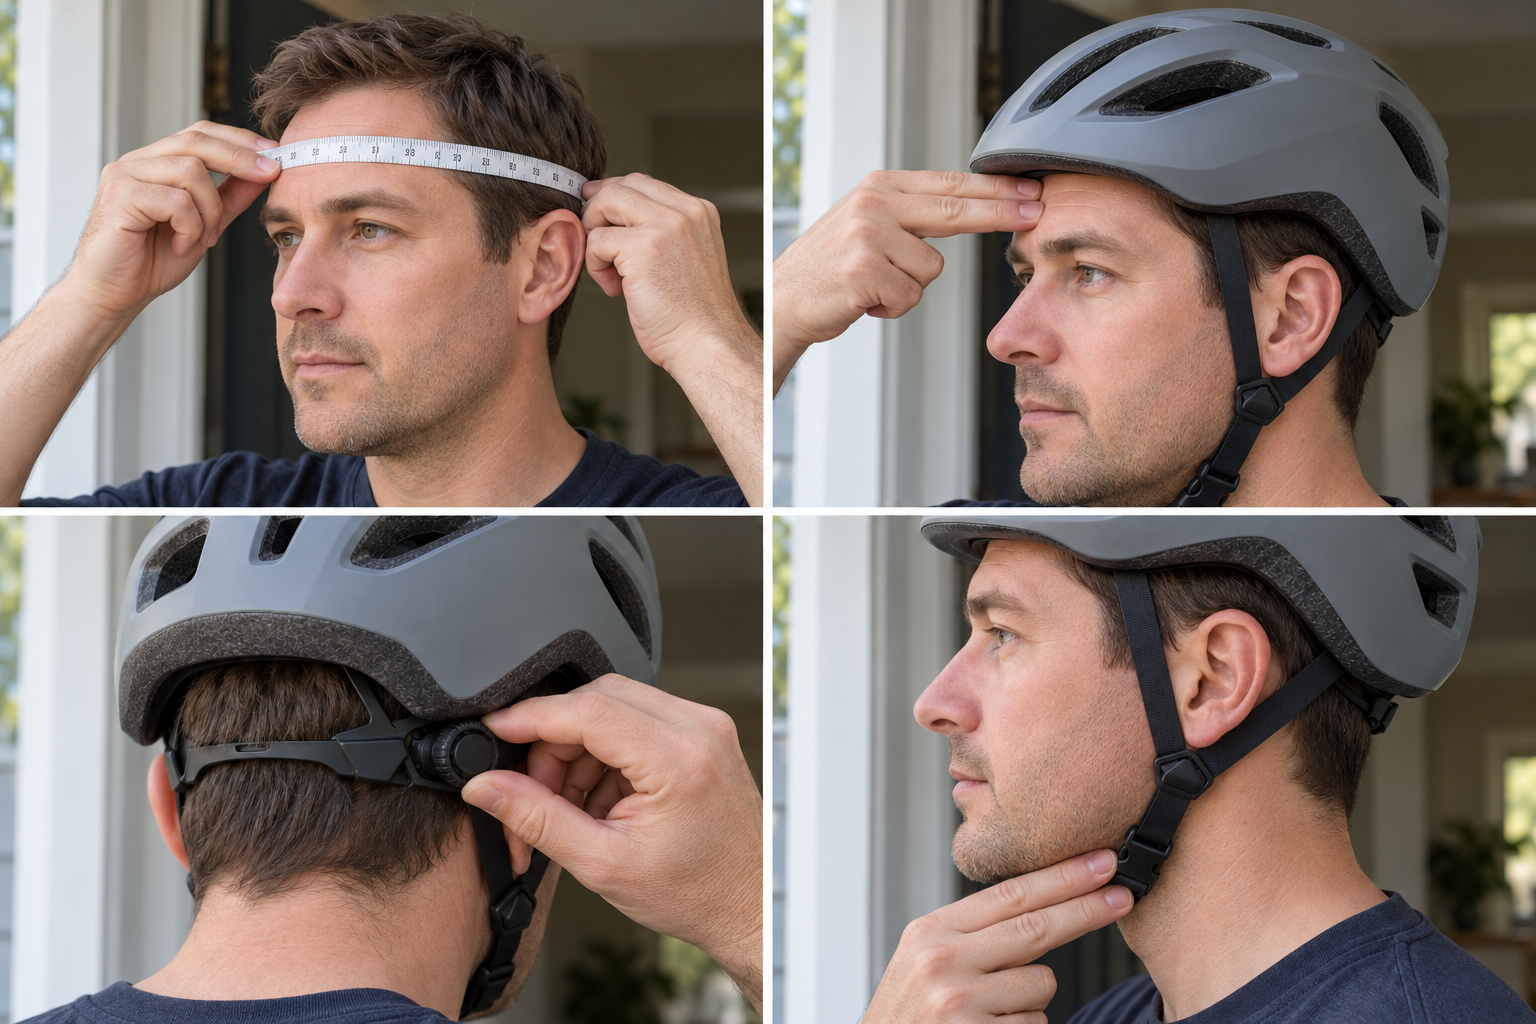
Helmet sizes use head circumference (the distance around your head). You need a flexible measuring tape, a mirror and the size chart for the exact model. If you use string, keep it unstretched and measure its length against a ruler afterwards.
- Wrap the tape horizontally around your head just above your ears and eyebrows, following the maker’s measuring position.
- Keep it flat against your head without pulling it tight. Use the mirror or a helper to check the back has not slipped down.
- Read where the tape meets its starting point and write the measurement in centimetres. Repeat to check you get a consistent number.
- Find that measurement in the model’s chart. For example, a hypothetical 57cm measurement falls inside a 55–59cm size range. Those numbers are an example, not a universal “medium”.
Use the measurement to choose a candidate size from that model’s chart. If you fall between sizes, try the relevant options according to the maker’s advice. If the helmet presses painfully despite being in the stated range, try another shape.
Step 2: Put the helmet on level
First identify the front using the helmet’s instructions. Loosen its rear fitting system so you can put it on without forcing it, then look straight ahead into the mirror.
Set the helmet level on your head. NHTSA’s general fitting guide places the front rim about two finger-widths above the eyebrows. Use your own fingers as a rough positioning aid, then follow your helmet’s instructions.
In the correct position, the upper forehead is covered and you can see clearly ahead. If the front points upwards, move it back into a level position before tightening. If correct positioning obstructs your view or will not sit comfortably, try another model rather than wearing it tipped back.
Step 3: Adjust the rear dial or cradle
The retention system (the adjustable band or cradle around the back of your head) helps hold the helmet in position. Many helmets use a small rear dial; other models use a different mechanism. Read the model’s instructions to identify which direction tightens it.
- Keep the helmet level in the position from the previous step.
- Adjust gradually until the cradle feels comfortably snug. Do not tighten until it hurts.
- Gently turn your head left and right. Notice whether the helmet shifts independently or stays in its intended position.
The helmet should now stay in position without a painful pressure point. If tightening the dial leaves it painful and still unstable, return to sizing or try another shape. The chin strap is still required; the rear adjustment does not replace it.
Step 4: Arrange the side straps and fasten the buckle
There are two straps beside each ear: one runs from the front of the helmet and one from the back. Where the model allows adjustment, arrange their junction to form a V below the ear. Repeat on both sides.
Fasten the chin buckle. Adjust strap length so it is snug and comfortable. NHTSA’s general guide uses space for two fingers between the fastened strap and chin; follow the specific helmet instructions where they differ. Do not leave a long loose loop.
Check that the buckle is secure, the straps sit correctly and the helmet remains level. If a strap rubs your ear, revisit its junction position. If the helmet moves during adjustment, repeat the positioning and rear-fit steps.
Solve the problem you can actually feel
Check the fit indoors before your ride. You should be able to identify what is wrong rather than repeatedly tightening everything.
| Problem | What to try |
|---|---|
| Front tips up and exposes forehead | Reposition level; check strap arrangement and rear fit again. |
| Helmet slides or rocks | Check that your measurement matches the size, then repeat the adjustments. Try another size or shape if it remains unstable. |
| Pain at the forehead or sides | Ease the fit adjustment. If the pressure remains, try another model rather than accepting pain. |
| Strap touches the ear | Reposition the permitted side-strap junction following the manual. |
| Buckle or adjustment part is damaged | Do not rely on it. Ask the maker about approved repair or replacement. |
If you cannot obtain a comfortable, secure fit, take the helmet to a bicycle shop and ask someone to demonstrate the adjustments on your head. You do not need to solve an unsuitable shape with extra tightening.
Understand safety information before buying
Fit and safety evidence answer different questions. A standard marking concerns compliance with its requirements; an independent rating describes performance in that test. Neither tells you whether the helmet sits correctly on your head.
- Find the exact model and its declared standards in the maker’s information and supplied documentation.
- If consulting an independent rating, search for that exact model rather than assuming every helmet from a brand shares its score.
- Compare the evidence alongside your fitting trial, price and everyday comfort.
Virginia Tech’s bicycle helmet ratings explain its test approach. Treat additional features as things to understand, rather than a reason to skip fitting.
Know when to stop using it
Keep the purchase date and the maker’s instructions. After an impact, follow its replacement guidance even when damage is not obvious. Also inspect the straps, buckle and adjustment system for deterioration.
Giro advises replacing a helmet after a crash and gives a three-to-five-year replacement recommendation; other makers may differ. Use your own helmet’s guidance. A second-hand helmet with unknown impact history leaves an important question unanswered.
For a child, fit the helmet now and recheck as they grow. Do not buy a loose helmet to grow into. Follow the maker’s cleaning and storage instructions and ask about suspected damage before using it again.
Before you leave
Put the helmet on using the same sequence: level position, rear fit, side straps and buckle. Check it again after changing hairstyle or anything worn underneath, because those changes can affect the fit.
Before leaving, confirm that your helmet stays in the intended position, feels comfortable and is correctly fastened. If any of those is missing, resolve it before riding. A more expensive helmet is not a solution to an unsuitable fit.
Official references: NHTSA’s general fitting guide and Giro’s sizing and helmet guidance. Keep the instructions for your particular helmet as the model-specific reference.
Join the discussion
What has worked for you? Share your experience or ask a question about this article.
Sign in with GitHub to comment. Your comment and GitHub profile name will be public. Comments appear when posted and may be moderated afterwards.
Keep replies relevant and respectful. No spam, personal information or unsupported accusations. Discussion and privacy information.